
I have had some questions lately asking me how I create the aura around my images so I thought I would write up a mini tutorial.
Firstly, colour your image and correct any areas where you have gone outside the lines with your blender 0. Allow the blender to dry thoroughly.

I keep two blender markers - a nice juicy one for correcting mistakes and for blender techniques, and a second dryish blender for softening areas of colour. I find if I use a juicy blender for this I end up with rings on my colouring where the blender has left a puddle on my image. So for colouring an "aura" I usually take my BG10 marker and my BG0000 marker, in addition to my dryish 0 blender.
 Taking your BG10, carefully outline your image trying not to touch the coloured image as you don't want ink running into your aura. (Tip- If this does happen, allow the area to dry and then use your BG10 to "push" the darker ink to the back of the image as lighter colours push darker colours away).
Then using your BG0000 and the side of your marker tip, flick outwards from the outline approx 1 - 1.2cm (or 1/2 inch). Don't worry too much if you can see the flick lines. We will fix this up. Go around the entire image doing this. If you find the BG10 line has dried a little and isn't blending with the BG 0000, go around a second time but only flicking 5mm (or 1/4 inch).

Using your dryish blender 0 marker, blend the outside of the flicks so they disappear and you are left with a gradual fade. A close up view:


Lastly, here is another example using G0000 to outline and flick (the image is a new Whiff of Joy release for November... I'll be posting the finished card later today - I hope, lol).

This also looks really nice with the V and R groups. I hope you find this useful! I would love to see your finished works using this tutorial, so please let me know how you go!
Firstly, colour your image and correct any areas where you have gone outside the lines with your blender 0. Allow the blender to dry thoroughly.

I keep two blender markers - a nice juicy one for correcting mistakes and for blender techniques, and a second dryish blender for softening areas of colour. I find if I use a juicy blender for this I end up with rings on my colouring where the blender has left a puddle on my image. So for colouring an "aura" I usually take my BG10 marker and my BG0000 marker, in addition to my dryish 0 blender.
 Taking your BG10, carefully outline your image trying not to touch the coloured image as you don't want ink running into your aura. (Tip- If this does happen, allow the area to dry and then use your BG10 to "push" the darker ink to the back of the image as lighter colours push darker colours away).
Then using your BG0000 and the side of your marker tip, flick outwards from the outline approx 1 - 1.2cm (or 1/2 inch). Don't worry too much if you can see the flick lines. We will fix this up. Go around the entire image doing this. If you find the BG10 line has dried a little and isn't blending with the BG 0000, go around a second time but only flicking 5mm (or 1/4 inch).

Using your dryish blender 0 marker, blend the outside of the flicks so they disappear and you are left with a gradual fade. A close up view:

A little bit furhter away:

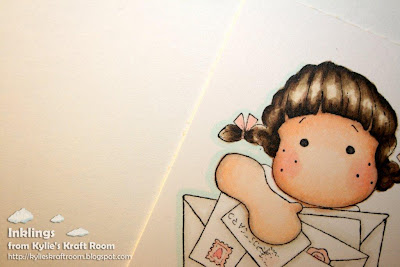
Lastly, here is another example using G0000 to outline and flick (the image is a new Whiff of Joy release for November... I'll be posting the finished card later today - I hope, lol).

This also looks really nice with the V and R groups. I hope you find this useful! I would love to see your finished works using this tutorial, so please let me know how you go!
Thanks for the toot...this is how I've tried it, but yours looks way better than mine! ;O)
ReplyDeleteXXX
I love using this technique on my images too...thanks for sharing this fab tutorial with us, Kylie!!!!!
ReplyDeleteHugs,t
WOW Thankyou Kylie, I love learning new stuff about Copic's and I will be giving it a go, now that I can see just what you mean! hahahah
ReplyDeleteHugs
Karen
xxx
This is amazing! If I ever switch to copics I know whom I'll be stalking, I mean asking hehe! LOVE it hun!
ReplyDeleteHugs Kel xx
Thank you so much for sharing your Copic wisdom with us Kylie, there is always something new to learn with Copics :o) I will be sure to try this and let you know how I go. *hugz*
ReplyDeleteSuch great tips Kylie - you are amazing with Copics - thanks so much for sharing.
ReplyDeleteYour tecnique is awesome!! Thanks for sharing!!
ReplyDeleteWow this is great, thank you so much I'm gonna have a try with my next card.
ReplyDeleteThis looks great.
Melanie-Jane
Great tute Kylie!
ReplyDeletexx
I can't believe I found your tutorial when I did, because I have only lately tried making the "aura," but had no idea how to do it. I especially love your tip about the two blenders, because I am having exactly the problem you speak of. I only have one blender and recently refilled it, and so I am getting the "rings" you speak of. I had no idea what to do about it until I read this. So, thank you so much for this! I am so glad I found your blog!
ReplyDelete